Power Apps Custom Connector using Microsoft Graph APIs
If you are not familiar with Microsoft Graph APIs, you should definitely check it out. These are very powerful set of APIs to use in your app leveraging data from almost all of the Microsoft cloud products e.g. Office 365, Azure Active Directory, OneNote etc. In this article, I’ll show you how to use Microsoft Graph API in Power Apps by building a custom connector, a very useful extensibility feature of Microsoft Power Platform.
During my days as a PM in Microsoft Power Platform product team, I wrote a blog in 2017 on a similar topic and it became very popular. I still get questions on this but a few things have changed since I wrote this post about 3 years ago. This post is more updated with the latest information and follows a relative simpler approach (spoiler alert: you don’t have to create the swagger file yourself now).
High level steps
Below are the high level steps to follow:
- Decide what Graph API to use and play around in Graph Explorer
- Register an app in Azure Active Directory that is authorized to use the Graph API
- Create a Custom Connector in Power Platform environment (this custom connector will use the app you registered in Azure Active Directory)
- Use the Custom Connector in your Power Apps app
It’s a long article involving many steps at different interfaces (Graph API, Azure, Power Apps). Get ready for this fun ride. Trust me it’ll be very satisfying at the end of it.
If you prefer watching video tutorial of these steps, see following video:
Decide what Graph API to use and play around in Graph Explorer
Microsoft Graph API documentation lists different Microsoft cloud services that can be used by the Graph APIs. Following is the snippet from their documentation site:
Microsoft Graph exposes REST APIs and client libraries to access data on the following Microsoft cloud services:
Microsoft 365 services: Delve, Excel, Microsoft Bookings, Microsoft Teams, OneDrive, OneNote, Outlook/Exchange, Planner, SharePoint, Workplace Analytics.
Enterprise Mobility and Security services: Advanced Threat Analytics, Advanced Threat Protection, Azure Active Directory, Identity Manager, and Intune.
Windows 10 services: activities, devices, notifications, Universal Print (preview).
Dynamics 365 Business Central.

Microsoft also provides very useful tool called Microsoft Graph Explorer using which you can play around with their APIs and see what data you need to pass and what do you get back. Sample Request and Response are also very helpful for using in a later step when we create the custom connector in the Power Apps environment.
Rest of this tutorial will illustrate how to use one of those APIs- the Graph API to get the list of users in your organization (provided you have the permission to do so). Below is the signature of this API:
GET https://graph.microsoft.com/v1.0/users
Play around with this API in Graph Explorer and see what you get.
Although this tutorial from now on will be specific to this particular API, you can use the same concepts for any Graph API.
Register an app in Azure Active Directory that is authorized to use the Graph API
For using Graph API as a custom connector in Power Platform (Power Apps or Power Automate aka Flow), you need to first register an app in Azure Active Directory. Registering the App in Azure Active Directory allows this app to use Azure Active Directory identity i.e. Microsoft credentials that you use to access Microsoft services and Graph API.
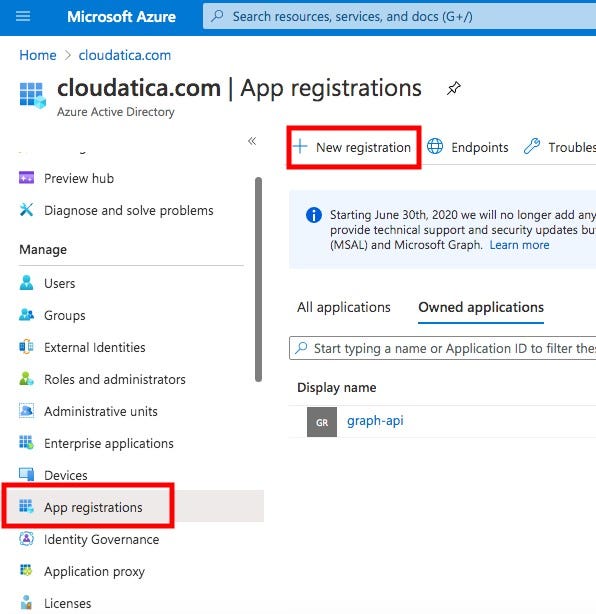
For registering the app, go to Azure portal (https://portal.azure.com), search for Azure Active Directory, and click on App registrations from the left pane, and click on New registration as shown in the picture below:
On the Application registration screen:
- Name- provide any name you like. I put “graph-api-demo”
- Supported account types — click on select the first option (Accounts in this organization only)
- Redirect URI, select “web” and provide following as the URI: https://global.consent.azure-apim.net/redirect
Your screen will look something like below:

Click on Register.
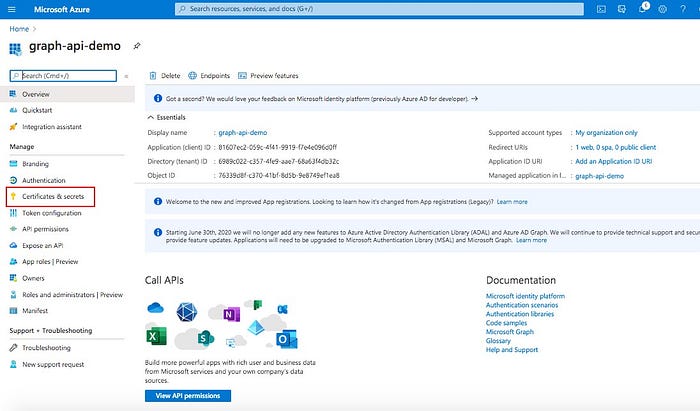
Your app is registered now. Note down the Application (client) ID . You’ll need this ID later when we create the custom connector in Power Apps environment.

Next step is to create a secret key for accessing this app. You’ll create the secret now and note it down for using it while creating custom connector in Power Apps environment (later step). For creating the secret, click on “Certificates & secrets” in the left navigation pane:
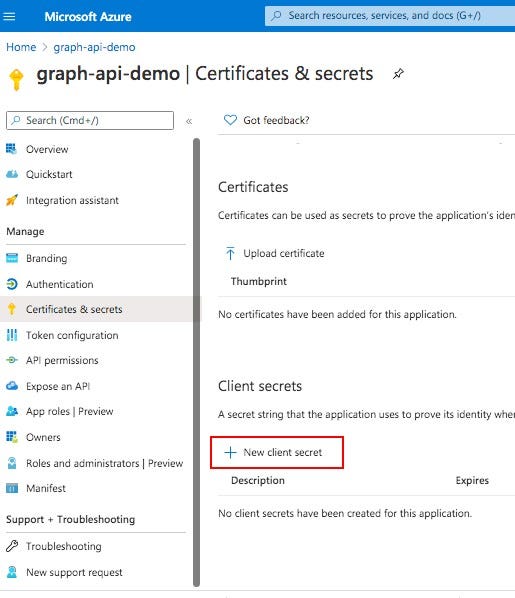
In the Certificates and secrets screen, click on “New client secret” under “Client secrets”:
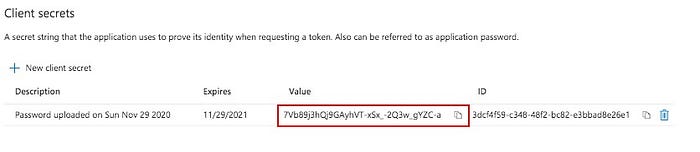
You’ll see a pop up screen. Description and expiry doesn’t matter for the purpose of this tutorial. Put any description that you like and choose the expiry timeframe you are comfortable with ( I chose 1 year). After you do that, you’ll see a secret created for you. Note this secret “Value” to be used in the later step of creating custom connector in Power Apps environment (see image below). Be sure to note it down because you can’t see it again after leaving this screen. You can create a new one but cannot see the value of the previous one. Below is the screenshot showing what value to copy (note- these secrets should be kept very securely. You might be wondering why am I showing these secret info in the post. Don’t worry. I removed all these after taking the screenshot for this article, so don’t try misusing them :) ):
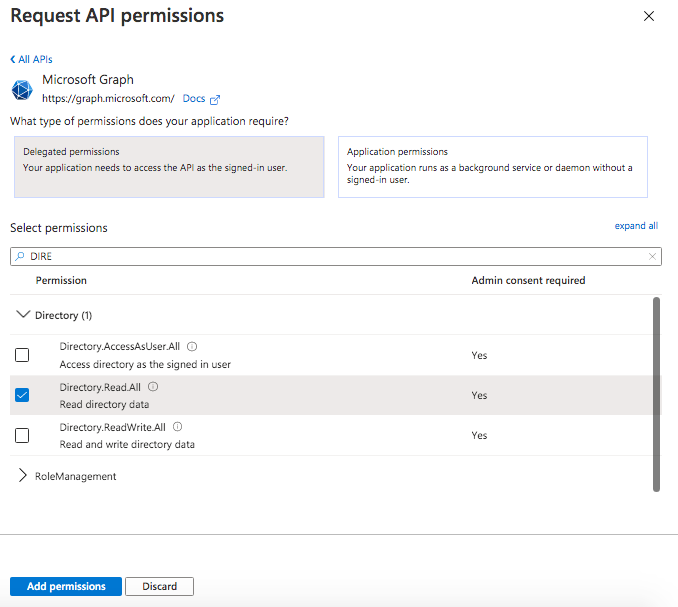
Last thing to do here is to add API permissions required for running your API. Click on “API permissions” in the left navigation menu. You’ll see multiple options there. For using Graph API, select Graph API -> Delegated permissions. After that, you need to add the API permissions that you need for running your graph API through this app via custom connector in Power Apps. For the relevant API illustrated in this tutorial (List Users), we need 2 permissions:
- User.Read — this is already granted
- Directory.Read.App — this has to be added. After adding this, you need to click on “Grant Admin consent for <your org>”.
After completing these steps, your API permission screen will look something like below:
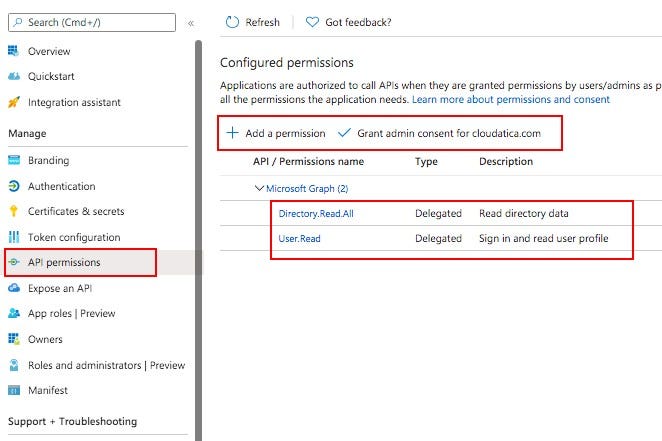
That’s it for this high level step. You are done with registering the app in Azure Active Directory, creating secrets, and granting the right permission so that this app can be used as a custom connector in Power Apps environment.
Create a Custom Connector in Power Platform environment
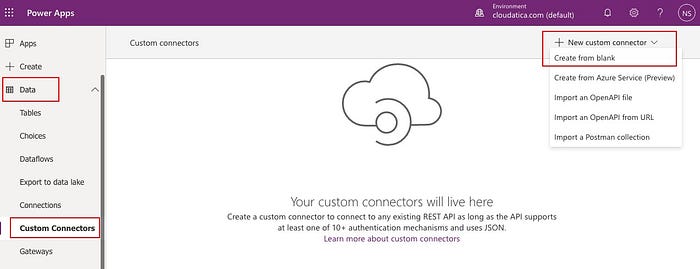
Now, go to https://make.powerapps.com and click on Data -> Custom Connectors -> New Custom Connector -> Create from blank
(In my earlier blog during Microsoft days, I had created a Swagger file for the API because that was the only option available at that time. That option is still available as “Import an OpenAPI file” but this “Create from blank” option is much simpler because you don’t have to worry about getting your Swagger file right.)
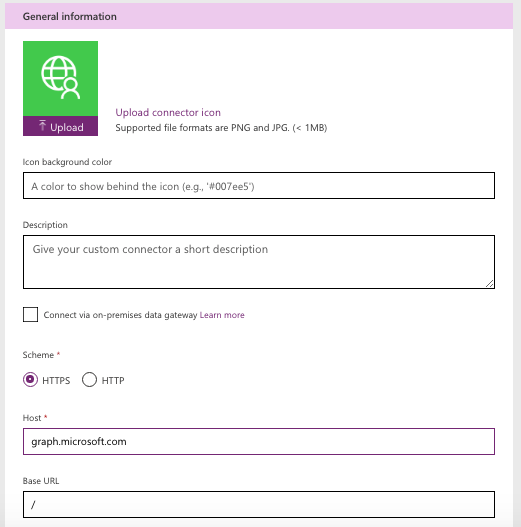
Give any name you want for this connector. I chose “graph-api-demo”. In the next screen of General information, put any description, logo etc per your preference and organizational requirements. For Host, put “graph.microsoft.com”. Leave rest of the fields as it is. It should look something like below:
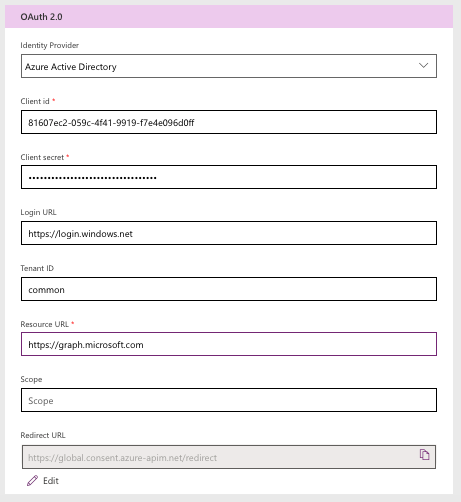
In the security step, choose authentication type as “OAuth 2.0”. Under OAuth options, provide following values:
- Identity provider: Azure Active Directory
- Client id: this is the client/ application id you noted down in the previous step of registering the app under Azure Active Directory
- Client secret: this is the client secret you created and noted down in the previous step of registering the app under Azure Active Directory
- Login url: https://login.windows.net
- Tenant ID: common (Leave as is)
- Resource url: https://graph.microsoft.com
- Scope: Leave as is
- Redirect url: No need to type anything. It’ll automatically create.
Your screen will look something like below at the end of this step:
In the next Definition step, you’ll create an Action. Combination of this Connector name and the Action name is what you’ll use to call this connector from your Power Apps app.
Click on Action -> New Action. In the New Action, put following values:
- Summary: any summary you want for this action. I just said “GetUsers”
- Description: any description you want for this action. I just said “GetUsers”
- Operation ID: this is the actual action name you’ll use in your Power Apps app. I said “GetUsers”.

Under Request, click on “Import from Sample”. From the Graph API documentation and by playing around with Graph explorer, you’ll know what to put here for your specific API. For the API in this tutorial- “GetUsers”, following are the relevant values:
- Verb: Get
- Url: https://graph.microsoft.com/v1.0/users
- Headers: <nothing- leave as is>
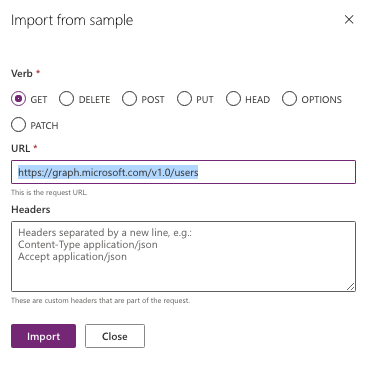
Click on “Import” button.
For Response, click on “default” -> “Import from Sample” and provide following values (I took them from Graph Explorer by playing around with this API):
- Headers: Response header sample for your Graph API- see from the doc or play around with the API in Graph Explorer.
- Body: Response body sample for your API- see from the doc or play around with the API in Graph Explorer.
Your screen will look something like below:
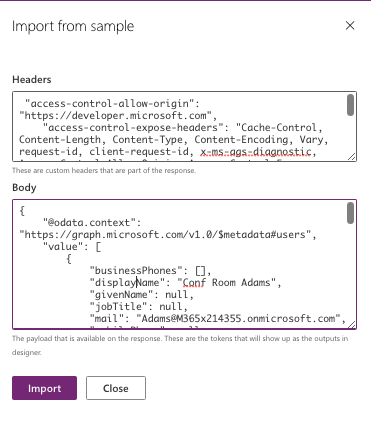
Click Import.
At this time, you should see “Validation succeeded” green checkmark. Now, click on “Create Connector” button at top right:
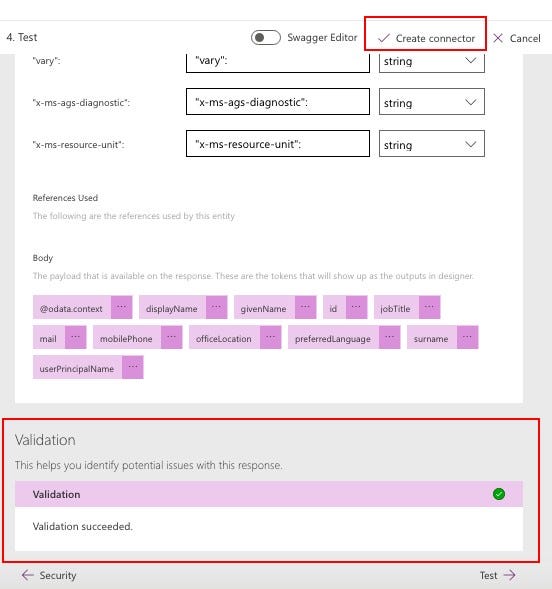
If you got all the steps right, you should see that the custom connector is successfully created and now you are ready to test it.
Pro Tip: You can add multiple actions within the same custom connector. So, if you want to use a different Graph API, you don’t need to create a new custom connector. Just add another action for that particular API.
Click Test. On the Test screen, you’ll see that Operation Id that you created earlier as the Operation. Click on “New Connection”. This will pop up a screen and ask you to create connection -> sign in -> grant permission. Go ahead to create this connection.
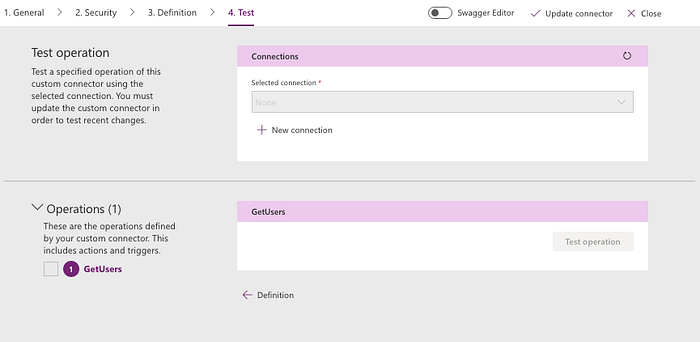
That’s it. You’ll see a new connection in the list of connections. For finishing testing, come back to this custom connector, hit edit icon, go to “Test” step, select the connect from the drop down of connections and click on “Test operation”. If you did everything right, you’ll see the list of users from your organization. Your test is successful and you are ready to use this connection in your PowerApps app.

Use the Custom Connector in your Power Apps app
This is the last part of this tutorial. Create a new canvas app from blank (I am not covering the basics of creating a canvas app here because I am assuming you already know that basic part). Put a simple button control. Add the connection you just created (graph-api-demo for my example). Now, in the OnSelect event of the button, put following formula:
ClearCollect(AllUsers, ‘graph-api-demo’.GetUsers().value)
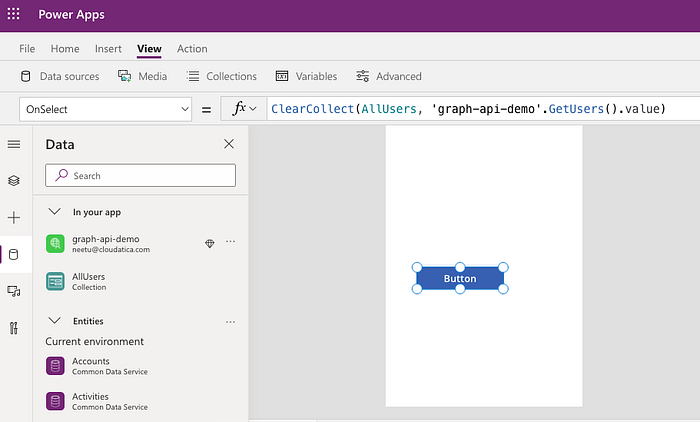
Now, preview the app and click on Button control. You’ll see the value of users in the Collection AllUsers (you can see the collections in Power Apps app by just clicking on the Collections menu).
That was the last step of this tutorial. Congratulations for sticking around and successfully completing this complex multi-step process.
Final thoughts
Graph APIs are very powerful set of APIs to leverage as a custom connector in Power Platform environment to fill any gaps or missing capabilities in their out of band connectors. This tutorial showed you how to use one Graph API and how to use that in Power Apps. You can use the same concepts for many additional use cases:
- Using other Graph API e.g. OneNote, Checking group membership, One Drive etc
- Using any other REST API (including the one you build) using Azure Active Directory Identity platform
- Creating other custom connectors in your Power Apps environment
- Using these custom connectors in Power Automate (formerly called Flow)
Hope you found this tutorial helpful. Will love to hear what you implemented. Cheers!
Stay in touch for similar tutorials
For getting regular articles and tutorials like these, subscribe to us on Medium, YouTube, or email newsletters.
For Training, 1:1 coaching, or Consulting help on Power Platform, Azure, or Data Science, please email us at hello@cloudatica.com or book a session at cloudatica.com .