Building a Nutrition Info App with Microsoft PowerApps using static Excel data
Building a PowerApps app with static Excel data is the easiest way to learn many PowerApps concept without having to worry about connecting to backend data sources. Although you cannot save the data with static Excel, there are many real life scenarios where you need to build PowerApps app using static data in Excel e.g. this nutrition info app that we will build in this tutorial:
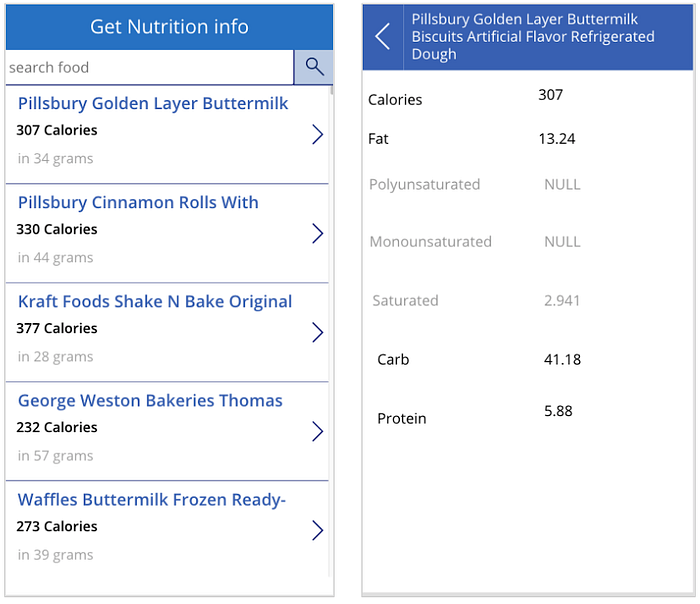
PowerApps concepts you’ll learn by building this app
- Getting static data from Excel into PowerApps
- Creating 2 screens app from scratch (Summary and Details)
- Navigation between screens (Navigate and Back)
- Showing and formatting summary fields in the Gallery control in Summary screen
- Using string concatenation formula (joining 2 strings)
- In the detailed screen, how to show more details of the selected item in the summary screen
- Implementing search feature in your app
- Using “HintText” property to show hint text/ placeholder to the user
If you prefer video tutorial, see this youtube video:
You can get the completed App and the data file in this Github repository.
Let’s get started.
Step 1: Format the data in Excel as Table
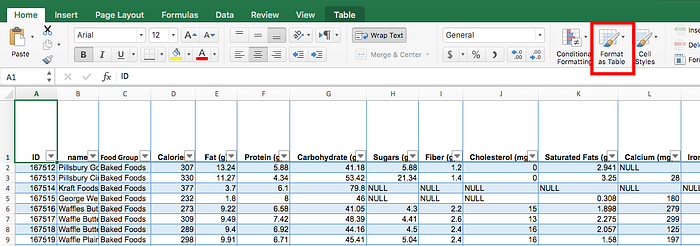
If you create your own data in Excel or download from internet, make sure that the data is formatted as Table in Excel. Just select the data and either press Control-T or select the menu option “Format as Table”.
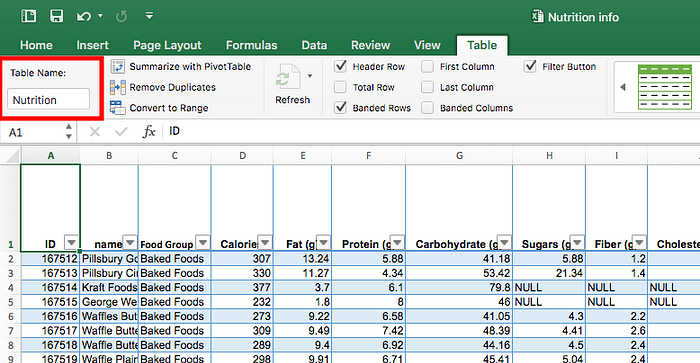
In the Table menu option, change the name of the table to “Nutrition” (or any name that you prefer).
Step 2: Start a blank canvas app and Import Excel Static data
Start a new blank canvas app in PowerApps. For importing Excel data, go to data sources and search for import and click the option “import from Excel” :
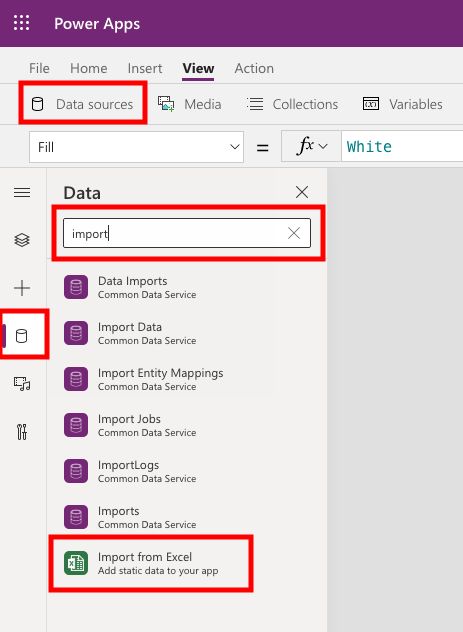
Select the spreadsheet and once it is done successfully, you’ll see “Nutrition” table added as a data source in your app. If you get an error here like “No tables were found in the Excel file”, that means you forgot to format the excel data as table- the previous step.
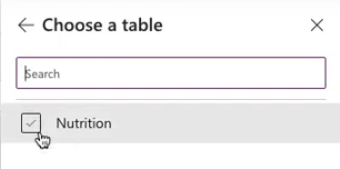
Step 3: Add Gallery Control and show data from the table you just added (“Nutrition”)
Add a Gallery control to the screen (Insert -> Gallery) and select the “vertical” template

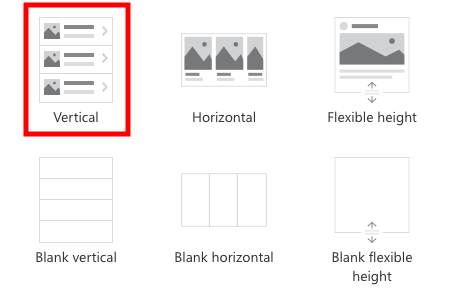
and change the item property of the gallery to “Nutrition” and change the layout to “Item, subtitle, and body”.
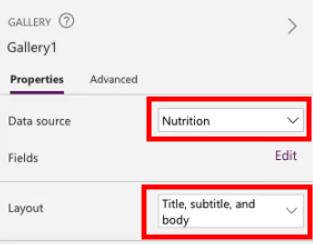
Now, click on Fields -> Edit (see in the picture above- the option NOT highlighted) and change the Title, Subtitle, and Body to below:
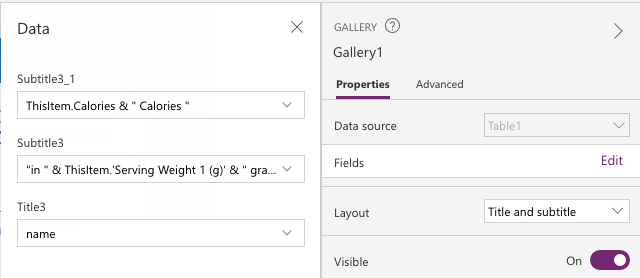
Title 3: name (this is the field in the Excel table that has the name of the food)
Subtitle3: “in” & ThisItem.Calories & “ Calories “ (basically we are joining strings “in” and “Calories” with the Calories field in the table)
Subtitle3_1: “in “ & ThisItem.’Serving Weight 1 (g)’ & “ grams” (basically we are joining strings “in” and “grams” with the “Service Weight 1(g)” field in the table)
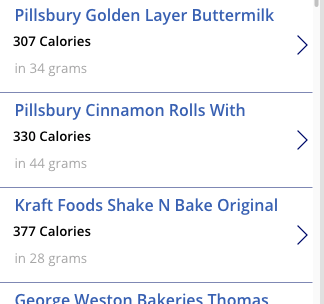
At the end of this step, you’ll see the Name, Calories, and Service size fields in the Gallery control of this summary screen. You can do some formatting and you’ll screen with look something like below:
Step 4: Add second screen to show the detailed nutrition info of selected item and implement navigation between summary and details screens
Now, you have the summary screen. For the detailed screen, insert a new screen to more details of the selected food item.
For navigating to the second screen, put following formula for OnSelect action of the arrow button (Screen2 is the name of the second screen, the detailed screen, in my app):
Navigate(Screen2,ScreenTransition.Fade)
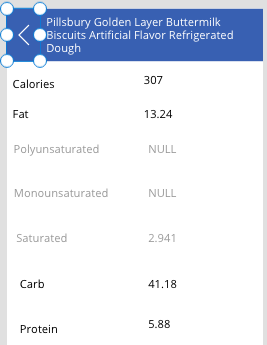
Since we are building this app on static Excel data, we cannot use Form control for the details. We will have to use the label controls to show those fields. For showing the detail of the selected item, put formulas like below as the text property of this label control e.g. for showing Fat, the formula would be:
Gallery1.Selected.’Fat (g)’
Gallery1 is the name of the Gallery control showing summary data in the Screen1 (the summary screen of the app). In my app, I showed following details and the label names like “Fat”, “Protein” etc. were just static text labels. You can also put the title in a different format to show the name of the food you selected. Lastly you should have a back icon and write Back() to the OnSelect action of the back button. This will allow the user to go back to previous screen (summary screen).
Step 5: Add search feature in the Summary screen
In the summary screen (Screen1 in my app), add a TextInput control where user can type the search text. For implementing search feature, update the Items property of the Gallery to
Search(Nutrition, textInputSearch.Text, “name”)
textInputSearch is the name of the TextInput control where user can type search text. This search searches on “name” column — that’s why 3rd argument of this function has the column “name” in it.
Now, since TextInput control has default text of “TextInput1” otherwise Gallery item will try to search for items with name column having “TextInput1”. If you make it “”, by default Search result will be list of all the items. When the user types some text now in the search box, Gallery items will be the search result. Also, set the HintText property to something meaningful like “Search” that shows a placeholder text to the user so that the user knows that it’s a search box.

That’s it. This was the last step. Your app is fully functional app now. You can do some prettification to make it decent.
Suggested enhancements as your home work assignments
If you are really enthusiastic, you can also do some additional enhancements to this useful app:
- Add a sort feature — sort by name, by calories etc
- Some filter feature — e.g. show calories < 300
Final thoughts
Hope this tutorial was fun and learning experience for you. Following are some key takeaways:
- You can learn a lot by building PowerApps app with static Excel data
- You can also create many practical useful apps with static Excel data — like this one
- And, reminder — don’t forget to format Excel data as “Table”. Many people struggle with this initial step
Good luck building great apps with PowerApps. Let us know if we can be of any help. Email us at hello@cloudatica.com or visit cloudatica.com
